How To Use A USB Flash Drive To Create An Emergency Mac OS Boot Device
<!–
–>
There may come a time when you need to boot your Mac computer into emergency mode. Maybe your system has crashed and will not start up, or maybe you need to troubleshoot a problem and want to avoid using the built-in recovery partition. In either case, having an emergency Mac OS boot device can be a lifesaver. This article will show you how to create one using a USB flash drive.
What Is An Emergency Mac OS Boot Device?
An emergency Mac OS boot device is a USB drive that contains a special version of the Mac OS operating system. This emergency version of the OS can be used to troubleshoot problems with your main system or to simply start up your computer if it will not do so on its own. This usually happens because of a problem with the computer’s hard drive or because of an issue with the OS itself.
Why Use A USB Flash Drive?
There are several reasons why you might want to use a USB flash drive to create an emergency Mac OS boot device. First, flash drives are small and easy to carry around with you. Second, they are relatively inexpensive. Finally, most modern computers have USB ports, so you will not need any special adapters or cables to use a flash drive. In short, USB flash drives are easy to use and very convenient at the same time.
In What Instances Do I Need To Create An Emergency Mac OS Boot Device?
You should create an emergency Mac OS boot device any time you are going to be working on your computer’s hard drive or installing a new version of the operating system. This way, if something goes wrong, you will have a backup that you can use to start your computer.
Creating an emergency boot device is also a good idea if you are going to be traveling with your computer. This way, if your computer gets lost or stolen, you will still be able to access your data.
How Do I Create An Emergency Mac OS Boot Device?
Creating an emergency Mac OS boot device is actually pretty simple. All you need is a USB flash drive that is at least 16 GB in size and a computer running the latest version of Mac OS.
How To Format Your USB Drive
The first thing you need to do before you start the whole process is to format your USB drive. This is because you want to make sure that the drive is completely clean and free of any viruses or malware. However, it’s important to remember that formatting your USB drive will delete all of the data on it, so make sure to back up your data first!
To format your USB drive, follow the steps below:
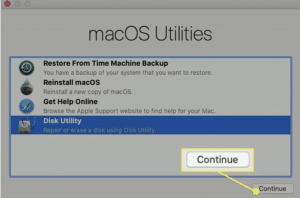
1. Plug in your USB drive and then start your Mac via macOS Recovery. To do this, restart your Mac and then press and hold Command + R immediately while your Mac is still restarting. Once you see a startup screen such as a spinning globe or the Apple logo, you can then release the keys that you have been holding down. If you are being prompted for a password, just type it in. You will know that startup is complete once you see the Utilities window.
2. Choose Disk Utility and then click Continue.
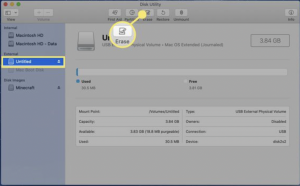
3. Select your USB flash drive from the list of drives that are attached to your Mac. Once you have selected your USB flash drive, click Erase.
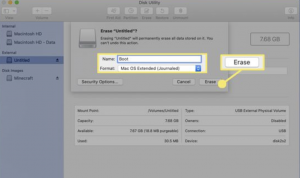
4. Type in any name for your flash drive. Sect Mac OS X Extended or Journaled from the Format drop-down menu and then select Erase.
5. At this point, Disk Utility will start formatting your USB flash drive. Once it is finished, click Done and then you can quit Disk Utility. Your USB flash drive is now ready to become a macOS or a bootable OS X installer.
Download The Operating System
After you have formatted your USB flash drive, it’s time to download the operating system that you want to make a backup for. After this, you will have to move it to your USB drive. Remember that the process of doing this differs slightly for different operating systems.
For Catalina, Mojave, and High Sierra follow the steps below:
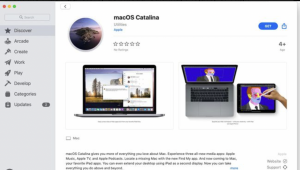
1. Download either Catalina, Mojave, or High Sierra from the Mac App Store.
2. Check your Applications folder because this is where the installers of these macOS versions will be placed directly. Look for them under the file names Install macOS Catalina, Install macOS Mojave, or Install macOS High Sierra.
3. In the event that the installer tries to open immediately after it has been downloaded, just simply quit it and do not proceed with the installation. This is not your goal.
4. Plug in or connect your USB flash drive to your Mac computer.
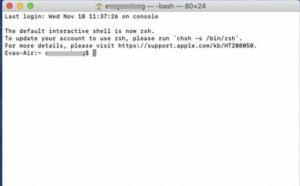
5. Go to Applications and then click Utilities. Open Terminal. You can also simply type Terminal into Spotlight Search so that the Terminal window will open immediately.
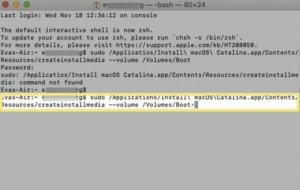
6. Once the Terminal window opens, enter the right command depending on the macOS installer that you are working with.
For Catalina:
sudo /Applications/Install \macOS \Catalina.app/Contents/Resources/createinstallmedia –volume/Volumes/NameOfMyUSBDriveHere
For Mojave:
sudo /Applications/Install \macOS \Mojave.app/Contents/Resources/createinstallmedia –volume/Volumes/NameOfMyUSBDriveHere
For High Sierra:
sudo /Applications/Install \macOS \High\Sierra.app/Contents/Resources/createinstallmedia –volume/Volumes/NameOfMyUSBDriveHere
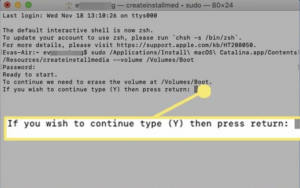
7. Once you are done entering the command, just hit Return.
8. If ever you will be prompted for your password, just type it in and then hit Return again.
9. Once you are prompted if you want to erase the volume, just type Y to confirm and then press Return.
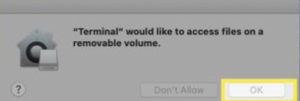
10. Terminal will then ask for permission to access files on a removable volume. Next, click OK so that you can continue. Terminal will show you its progress as it transfers the macOS to your USB flash drive.
11. Once it’s done, the volume will adapt the same name as the name of the installer downloaded. For instance, Install macOS High Sierra.
12. Quit Terminal and then eject the USB flash drive or volume.
For El Capitan, take note of the following:
The process is mostly the same when you are downloading El Captian. However, El Capitan downloads as a disk image instead of an installer package like Catalina, Mojave, and High Sierra. Once you download El Capitan, simply open the disk image and run InstalMacOSX.pkg which is the name for El Capitan’s installer.
This process will install an app called Install OS X El Capitan into your Applications folder. Next, just create your bootable installer using this app. Remember to not use the disk image. Then, just follow the instructions above for the next steps.
So, How Do I Use My Emergency Boot Device?
Now that you have a bootable flash drive in your hands, use it as an installer using the steps below:
Remember that you should be connected to the Internet while you undergo this process. Otherwise, it might take longer or even fail.
1. Insert or connect your USB flash drive to your Mac.
2. Use either the Startup Disk or Startup Manager preferences so that you can select the bootable installer as your startup disk.
3. Start up using your bootable installer.
4. At this point, your Mac will start up to the macOS Recovery mode.
5. If ever you will be prompted to choose a language, go ahead and choose one.
6. Select Install macOS or Install OS X from Utilities.
7. Hit Continue and then just follow the instructions to successfully install OS X or macOS on your Mac computer.
These processes are really helpful when you encounter any problems with your Mac that could potentially be fixed by reinstalling the operating system. It is always good to have a backup plan and emergency boot device, like a USB flash drive, which can really save you from a lot of headaches in the future.
Even though Mac computers are reliable and highly functional, sometimes things can go wrong. If you are prepared with an emergency boot device, you will be able to fix any problems that come up and get your Mac computer running like new again in no time.
Want to know more about Apple Products?
We launch new articles subscribe and get updated. MAX 1 email a week. No spam, ever.